
Mastering Canon’s Auto Lighting Optimizer: A Comprehensive Guide. Elevate Your Photography with Canon’s ALO: Your Ultimate Guide to Better Photos. Unleashing the Power of Your Camera
Mastering your camera’s settings in the intricate world of photography can unlock the door to awe-inspiring shots. At the helm of these settings, manipulating light and contrast sits the Auto Lighting Optimizer (ALO).
On a Canon camera, the ALO is a powerful in-built tool designed to automate the process of achieving balanced exposures in your images. It does so by adjusting the brightness and contrast of a photo, effectively optimizing the lighting conditions in each shot.
A rudimentary understanding of the ALO on your Canon can transform how you handle your camera, bringing out the best in your photographs by ensuring they are well-lit and vibrant. The ALO adjusts the exposure of an image during in-camera processing, enhancing details in the darker parts of the photo without overexposing the brighter areas.
| Feature | Description |
|---|---|
| Functionality | Balances exposure and optimizes lighting conditions |
| In-Camera Adjustment | Adjusts the brightness and contrast during in-camera processing |
| Benefit | Enhances details in darker parts of the image without overexposing brighter areas |
The Auto Lighting Optimizer is particularly beneficial in tricky lighting situations where the scene’s contrast between light and dark areas is high. However, it’s important to remember that while ALO can enhance many photos, it may only sometimes produce the desired results. Understanding when and how to use this tool is crucial to achieving optimal results in your photography.
This guide delves into the depths of the Auto Lighting Optimizer on a Canon camera, providing a comprehensive look at how to leverage this feature to its maximum potential. Stay tuned to discover how to enhance your images using this powerful tool, from understanding its basic functionality to exploring its impact on different Canon models and scenarios.
Understanding Auto Lighting Optimizer
Delving into photography as a beginner or enthusiast calls for a nuanced understanding of camera features. One feature integral to refining your photography skills is the Auto Lighting Optimizer (ALO).
The ALO is an intelligent software feature in Canon cameras that works behind the scenes to manage the contrast and brightness in your shots. It compensates for undesirable lighting conditions by automatically adjusting your images’ dark and bright areas, ensuring every detail is well-illuminated and visible.
You might wonder if the ALO operates similarly in all Canon cameras. The truth is, while the fundamental role of ALO remains the same, its functionality can vary somewhat between Digital Single-Lens Reflex (DSLR) and mirrorless cameras due to differences in their sensor and imaging technologies.
DSLR cameras, with their mirror mechanism, and mirrorless cameras, with their direct light path to the sensor, interact differently with light. Consequently, the ALO function has been tailored to work optimally within the constraints of each type of camera.
Let’s look at a comparative overview of ALO in DSLR and mirrorless cameras:
| Feature | ALO in DSLR Cameras | ALO in Mirrorless Cameras |
|---|---|---|
| Function | Adjusts the brightness and contrast during in-camera processing. | It performs the same function but benefits from the direct light path to the sensor. |
| Suitability | Ideal for challenging lighting conditions, such as high-contrast scenes. | Equally suitable for high-contrast scenes but potentially more accurate due to the absence of a mirror mechanism. |
| Performance | Effectiveness can depend on the specific DSLR model. Generally more consistent performance across different models. | |
| Control | Allows for manual control over ALO settings. | Offers similar levels of manual control over ALO settings. |
By understanding the role of the Auto Lighting Optimizer and how it operates in different cameras, you can better harness its capabilities to enhance your photography. Whether you’re using a DSLR or a mirrorless Canon, the ALO is a robust tool, ready to optimize your images and ensure they’re beautifully lit. In the following sections, we’ll delve deeper into how to control successfully and make the most of this feature in your photographic journey.
How to Use ALO
Having acquainted ourselves with the function and purpose of the Auto Lighting Optimizer (ALO), it’s time to explore how to utilize this feature across different Canon models. Let’s focus on three popular models: Canon 5D Mark III, Canon 7D, and Canon 80D.
Here’s a general step-by-step guide on how to enable and adjust ALO settings:
- Turn on your Canon camera and press the ‘Menu’ button.
- Scroll through the menu settings until you find the ‘Shooting Settings’ tab (often marked with a camera symbol).
- Within this tab, locate ‘Auto Lighting Optimizer.’
- Select this setting, and you’ll see options typically ranging from ‘Disable,’ ‘Low,’ ‘Standard,’ to ‘High.’
- Choose the desired level of optimization. ‘Standard’ is often a reliable choice for general shooting, while ‘High’ might be beneficial in particularly challenging lighting conditions.
- Press ‘OK’ or ‘Set’ to save your changes.
This process may vary across different camera models due to interface differences. However, the general principle remains the same.
| Model | Additional Steps |
|---|---|
| Canon 5D Mark III | Under ‘Shooting Settings,’ Auto Lighting Optimizer is located in the fourth sub-menu. |
| Canon 7D | ‘Shooting Settings’ are divided into multiple tabs. You’ll find Auto Lighting Optimizer in the second tab. |
| Canon 80D | In the ‘Shooting Settings’ tab, Auto Lighting Optimizer is conveniently located in the first sub-menu. |
Let’s address a common question: „What’s the difference between ALO and other settings like Highlight Tone Priority, and when should one be preferred?“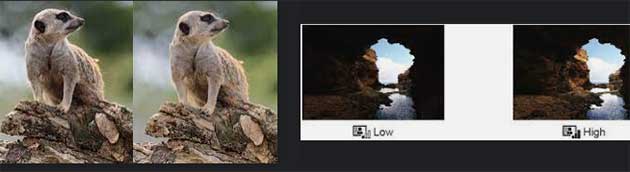
Highlight Tone Priority (HTP) is another useful feature that prevents the overexposure of bright areas in your photos, preserving more detail in the highlights. While ALO adjusts dark and bright regions, HTP focuses on maintaining detail in the highlights.
Although they might seem similar, their use cases can be distinct. ALO is versatile and suitable for various scenarios, from portraits to landscapes, where you want to maintain detail across the entire tonal range. On the other hand, HTP shines (quite literally!) in high-contrast scenarios where you risk blowing out the highlights.
| Setting | Pros | Cons |
|---|---|---|
| Auto Lighting Optimizer | Balances both shadows and highlights. Ideal for general shooting scenarios. | It may sometimes lead to images needing to be flatter due to its overall effect on tonal range. |
| Highlight Tone Priority | Preserves detail in bright areas. Excellent for high-contrast scenes. | It only impacts the bright spots. Not ideal for low-contrast locations as it could unnecessarily darken the image. |
While both ALO and HTP offer great tools for managing the dynamic range in your shots, your choice should depend on your specific shooting scenario and creative vision. Understanding the nuances of these features will empower you to make the rightest decision for any photographic challenge you may encounter.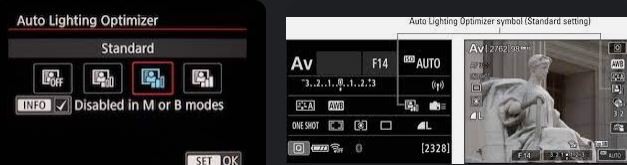
ALO: When and Why to Use It
The Auto Lighting Optimizer (ALO) is not just another set to explore on your Canon camera but a powerful tool to enhance image quality in various scenarios. We’ll discuss when and why to use it, addressing the question: „Should I keep Canon Auto Lighting Optimizer on or off?“
Consider a scenario: you’re shooting a portrait against a bright, sunny background. Without ALO, you might encounter a common problem: the environment is well-exposed, but your subject’s face is shrouded in shadow. Switch on ALO, and watch as it balances the contrast, lifting shadows on your subject’s face while preserving the well-lit background.
Another situation where ALO becomes a game-changer is when you’re dealing with backlit subjects. Backlit photography can create a dramatic effect and lead to underexposed subjects. By enabling ALO, your camera will automatically brighten up the shadows on your subjects, making a balanced exposure.
ALO also proves beneficial in high-contrast scenarios, such as a landscape shot on a sunny day with a significant disparity between shadows and highlights. ALO minimizes this disparity, preserving details in shadowy and bright areas.
So, should you keep ALO on or off? It ultimately depends on the situation. Having ALO switched on in high-contrast scenarios or when dealing with backlit subjects can significantly improve your results. However, you might prefer to turn ALO off in low-contrast scenes or when you’re aiming for a specific aesthetic, such as a silhouette effect.
Another factor to consider is post-processing. If you’re shooting in RAW and plan on extensively editing your photos, you might prefer to keep ALO off. It is because ALO, like other in-camera processing, can limit the flexibility in post-processing.
| Scenarios | ALO: On or Off? |
|---|---|
| High-contrast scenes | On |
| Backlit subjects | On |
| Low-contrast scenes | Off |
| Seeking silhouette effect | Off |
| Planning extensive post-processing | Off |
Remember, photography is an art. The settings are there to assist you, but the final decision always rests with the artist. Understanding how tools like ALO work can help you make informed decisions and elevate your photography to new heights.
ALO and RAW Files
There’s a persistent question in the photography community: „Does Auto Lighting Optimizer work with Canon RAW images?“ Let’s clarify this topic and understand how ALO interacts with RAW files and impacts their post-processing.
RAW images are akin to digital negatives, storing all the information captured by the sensor, offering maximum flexibility during post-processing. When you capture an image in RAW format, the camera records the settings of various in-camera adjustments, including ALO, but these aren’t applied directly to the image data. Instead, they’re stored as metadata—additional information attached to the file.
This question arises because when you open a RAW image on your computer, the initial preview might reflect the effect of ALO. However, this is only a preview generated based on the stored metadata. When you start editing the RAW file in software like Adobe Lightroom or Canon’s Digital Photo Professional (DPP), the ALO effect is not baked into the image data, and you have the flexibility to modify the image as you see fit.
It leads us to the impact of ALO on the post-processing of RAW images. If ALO is enabled while shooting, it might influence your perception of the photo when previewing it, potentially guiding your editing process. However, it’s important to remember that these adjustments are not permanent changes to the image data and can be overridden during post-processing.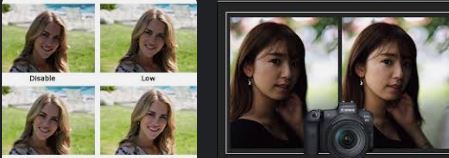
While the Auto Lighting Optimizer can be a valuable tool for JPEG images, its impact on RAW files is more nuanced. It doesn’t alter the RAW image data but can influence your initial perception of the image and, thereby, your editing decisions. Ultimately, the power of post-processing RAW files remains in your hands, giving you the artistic freedom to create the final image as you envision it.
Advanced Topics: ALO and Memory
When it comes to the nitty-gritty of photography, understanding how various settings can impact your camera’s performance is crucial. One such aspect we’ll delve into today concerns the Auto Lighting Optimizer (ALO) and its potential impact on memory and shooting rate.
Firstly, let’s clear a common misconception: enabling ALO doesn’t directly impact your camera’s memory storage capacity. The optimizer works by adjusting the brightness and contrast of your images, but it doesn’t alter the file size in a significant manner. Therefore, the number of images you can store in your memory card remains unchanged whether ALO is enabled.
However, the story is slightly different when discussing the shooting rate, especially in burst mode. While ALO doesn’t notably change the file size, it does require some processing power to analyze and adjust each image. In a scenario where you’re shooting continuously in burst mode, this extra processing might cause a marginal decrease in the shooting rate.
To address the question, „Does highlighting improve memory?“ It’s important to note that the term „highlighting“ in this context could be misinterpreted. It doesn’t inherently improve memory if we’re talking about „highlighting,“ as in applying ALO or Highlight Tone Priority. Instead, these features optimize the visual details of the image. In other words, they enhance the image quality by managing the highlights and shadows but do not expand storage capacity or improve the camera’s memory.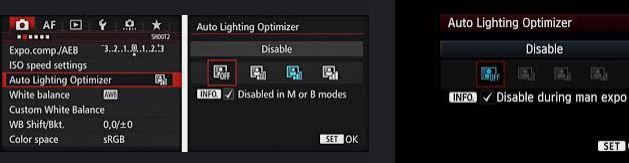
In conclusion, while ALO can be a valuable tool for optimizing your images directly in the camera, it’s essential to understand its impact on your camera’s operation. Despite the slight processing overhead, many photographers find the benefits of this feature well worth it, mainly when shooting in challenging lighting conditions where the balance of shadows and highlights can make all the difference.
ALO and Image Noise
In photography, the term ‘noise’ refers to visual distortion, appearing as random specks that reduce the clarity of a photo. It’s similar to the grain in film photographs but can be more pronounced in digital images, particularly in low-light scenarios. With this in mind, let’s dive into the relationship between Canon’s Auto Lighting Optimizer (ALO) and image noise.
ALO works by adjusting the brightness and contrast of your images, particularly in the shadows. This process can potentially increase the visible noise in your images in low-light conditions or when shooting with a high ISO setting. When ALO brightens underexposed areas, it may amplify the digital noise.
However, you should still use ALO in some low-light situations. It’s about understanding the trade-offs and using your tools wisely. So, how do you minimize image noise when using ALO? Here are some valuable suggestions:
- Choose the Right ISO: Image noise increases with higher ISO values. When shooting in low light, try to find the right balance. Use the lowest ISO that allows good exposure for the scene. Sometimes, a bit of noise is acceptable if it means capturing the moment.
- Shoot in RAW: Shooting in RAW format can give you more flexibility during post-processing, including noise reduction. While ALO doesn’t directly impact RAW images, you can still mimic its effects in post-processing software while controlling the noise level.
- Post-Processing: Make use of noise reduction tools in your post-processing software. Lightroom and similar applications have excellent noise reduction tools that can help reduce noise visibility.
- Proper Exposure: Try to get the right exposure in-camera to reduce the need for significant brightening in post-processing. It can help minimize noise.
In conclusion, while ALO can potentially increase the noise in specific lighting scenarios, you should utilize it. Understanding the context and adjusting your settings accordingly can help you harness the benefits of ALO while minimizing potential noise.
Conclusion
In our journey through the world of Canon’s Auto Lighting Optimizer (ALO), we’ve discovered its dynamic range of capabilities, the intricacies of its functioning, and the scenarios where it shines. We’ve covered how to enable and adjust ALO on various Canon models and compared ALO and other settings like Highlight Tone Priority.
We’ve also explored how ALO influences RAW images and their potential impact on image noise. Importantly, we’ve seen that while ALO can be a powerful tool, its effectiveness largely depends on the context of the shoot and the photographer’s understanding of its strengths and weaknesses.
To truly elevate the quality of your images, it’s essential to understand and effectively utilize camera settings like ALO. Every tool in your photography arsenal, ALO included, is a step towards perfecting your craft and capturing images that tell a story.
References:
-
- Busch, David D. David Busch’s Canon EOS 5D Mark III Guide to Digital SLR Photography. Cengage Learning PTR, 2012.
- David Busch’s Canon EOS R5/R6 Guide to Digital Photography by David D. Busch

Марта Савова е журналист и писател, специализиран в областите здравеопазване, технологии и наука. С над 20-годишен опит в сферата, тя е публикувала множество изследователски статии и има страст към споделянето на знания. Марта е редовен сътрудник на различни медии.
While exposure compensation can be helpful, it’s not a one-size-fits-all solution. In some situations, it’s better to adjust the aperture or shutter speed instead. Understanding the exposure triangle and how each setting affects the final image.
Custom shooting modes can be convenient but can confuse beginners. Understanding how the different settings work is important before creating your custom modes. Otherwise, it could lead to frustration and missed shots.
Back-button focus may be useful for some photographers, but only for some. It takes time to get used to, and it may need to be more practical for fast-paced situations. It’s all about personal preference and shooting style.
While custom white balance can be useful in some situations, I find it easier to shoot in RAW and adjust the white balance in post-processing. That way, I have more control over the final result.
I don’t think using the built-in levels is necessary. If you have a good eye for composition, you can easily adjust the horizon in post-processing. Plus, it takes up precious space on the camera’s LCD screen.